The 5 DIY Whelping Box Plans
Build the perfect whelping box for your expecting dog! Explore 5 DIY plans, from easy plywood builds to creative designs. Find your ideal whelping box DIY project today!
As your furry friend prepares for motherhood, creating a safe and comfortable whelping box becomes an essential part of the preparation process. Building your own whelping box allows you to customize it to your dog’s needs and offers a sense of accomplishment.
This guide delves into 5 DIY whelping box plans, ranging from simple plywood constructions to more elaborate designs, empowering you to choose the perfect option for your expecting canine companion.
1. Sturdy Collapsible Whelping Box
Step-by-Step DIY Guide to Build a Sturdy Collapsible Whelping Box
Welcome expecting dog owners! Creating a safe and comfortable environment for your furry friend to whelp her puppies is crucial. This step-by-step DIY guide will equip you with the knowledge and instructions to build a sturdy collapsible whelping box, saving you money and providing a personalized haven for your soon-to-be-born canine companions.
Materials:
- (4) 48″ x 24″ pre-finished bullnose shelving boards
- (4) 4″ x ¾” corner braces
- (8) 4” x 7/8” corner braces
- 4′ x ½” plywood
- (3) 2′ x 4′ x 8′ stud boards
- (4) 2” 90° DWV Sanitary Elbow
- (4) 2” PVC Sanitary Tee
- (2) 2” x 10’ DWV/40 PVC pipe
- Screws
- Blankets
Tools:
- Tape measure
- Jigsaw
- Drill
Before you begin:
Ensure you have ample space for the assembled whelping box. Consider the size of your dog and the expected number of puppies when determining the appropriate dimensions. Remember, this design is collapsible, making it easier to store when not in use.
Cutting the components:
- Plywood base: Using the jigsaw, cut the plywood sheet to create a 48″ x 24″ base for the whelping box.
- Walls: Cut the four pre-finished shelving boards to 24″ in height. These will form the walls of the box.
- Support panels: Cut two 2′ x 4′ stud boards into 24″ sections. These will act as support panels for the collapsible walls.
- Door frame: Cut the remaining stud board into two 12″ and two 24″ sections. These pieces will form the frame for the whelping box door.
Assembling the base and walls:
- Attach the support panels: Secure the 24″ support panels to the longer edges of the plywood base using screws and corner braces.
- Connect the walls: Attach the pre-cut wall panels to the support panels using screws and corner braces. Ensure a snug fit to create a sturdy structure.
Building the collapsible frame:
- Drill holes: Drill matching holes through the center of each wall panel and the corresponding support panel, approximately 3 inches from the top.
- Insert PVC pipes: Cut the PVC pipes into four 24″ sections. Insert each pipe section through the drilled holes, connecting the walls to allow for collapsing and expanding the box.
- Secure the PVC frame: Secure the PVC pipes in place using screws and corner braces on both sides of the walls and support panels.
Creating the door:
- Assemble the frame: Screw the 12″ and 24″ stud board pieces together to create a rectangular door frame.
- Attach hardware: Install hinges on one side of the door frame and a latch on the other side to allow for easy access to the whelping box.
- Attach the door: Secure the completed door frame to the front of the whelping box using screws and corner braces.
Finishing touches:
- Sanding: Smooth any rough edges on the wood components using sandpaper for a polished look and added safety.
- Lining the box: Line the interior of the whelping box with soft blankets or towels, providing comfort and warmth for the mother and her puppies.
- Placement: Choose a quiet and draft-free location for the whelping box, allowing your dog to feel safe and secure during whelping and caring for her newborn pups.
Congratulations! You’ve successfully built a sturdy collapsible whelping box for your expecting canine companion. Remember to monitor your dog closely during whelping and seek professional veterinary advice if needed.
BALAPET Foldable Whelping Box & Puppy Playpen

Ensure a secure and comfortable environment for your expectant dog and her new litter with the BALAPET Foldable & Portable Whelping Box. Designed for enhanced stability, this whelping pen features a square shape reinforced with four hook and loop fasteners at the corners of the base, providing a sturdy and reliable space for birthing and early puppy development. Crafted from durable, waterproof Oxford cloth, both the sides and bottom are thick and lasting, offering a safe haven free from offensive odors. Available in two convenient sizes (Small: 31x31x10 inches, Medium: 37x37x12 inches), please note the small size is not recommended for very large dog breeds.
The BALAPET Whelping Box is not only a crucial piece of dog birthing equipment but also doubles as a versatile puppy playpen, offering a confined and safe area for puppies to explore as they grow. Its design prioritizes ease of cleaning; simply rinse with water or wipe down with a cloth for quick and hygienic maintenance, ensuring it’s ready for immediate reuse. This essential pet accessory is perfect for puppy training, providing a secure boundary for young dogs. Please be aware that this whelping box is not intended for use as a dog bathing pool.
Pros
- Enhanced stability with square design and corner fasteners.
- Made from durable, waterproof, and odorless Oxford cloth.
- Easy to clean; simply rinse or wipe down.
- Portable and foldable for convenient storage and transport.
- Doubles as a secure puppy playpen for various uses.
- Provides a safe and contained environment for birthing and puppy care.
Cons
- Small size is not suitable for very large dog breeds.
- Cannot be used as a dog bathing pool.
- May require additional bedding for optimal comfort.
2. Simple Plywood Whelping Box
Step-by-Step DIY Guide to Build a Simple Plywood Whelping Box
Creating a safe and comfortable birthing space for your expecting canine companion is an essential part of preparing for her new arrival. Building a simple plywood whelping box is a cost-effective and rewarding way to provide the perfect environment for your dog to whelp and care for her newborn puppies. This step-by-step guide will equip you with the knowledge and instructions to construct a functional and practical whelping box using readily available materials.
Materials:
- (4) 4′ x 8′ sheets of ½” plywood
- (8) 2” x 4” x 8′ lumber boards
- (2) sets of heavy-duty hinges
- Screws
- Drill
- Jigsaw
- Sandpaper
- Soft blankets or towels
Before you begin:
- Consider the size: Determine the appropriate size for your whelping box based on your dog’s breed and the expected litter size. A general rule of thumb is to make the box at least twice the length and width of your dog when she is lying down.
- Choose a location: Select a quiet and draft-free location in your home for the whelping box. This will provide a sense of security and comfort for your dog during whelping and caring for her puppies.
Building the whelping box:
- Cutting the plywood panels:
- Use the jigsaw to cut the plywood sheets into the following pieces:
- Four side panels: Cut each sheet into four pieces, measuring according to your desired box height (typically 18-24 inches).
- One base panel: Cut one sheet to the desired length and width of the whelping box.
- Use the jigsaw to cut the plywood sheets into the following pieces:
- Constructing the walls:
- Lay the side panels flat on a work surface and secure them together using the 2″ x 4″ lumber boards and screws. Create a rectangular frame using the lumber boards along the top, bottom, and sides of the panels.
- Repeat this process for the remaining three walls.
- Assembling the base:
- Attach the four wall frames to the plywood base panel using screws and corner braces. Ensure a secure and stable connection.
- Creating the door:
- Cut one of the remaining plywood sheets into a piece suitable for the door (approximately half the width of the box and the same height as the walls).
- Attach hinges to one side of the door frame and a latch to the opposite side for easy access.
- Secure the door frame to the front of the whelping box using screws and corner braces.
- Finishing touches:
- Sand down any rough edges on the wood components for a smooth and safe finish.
- Line the interior of the whelping box with soft blankets or towels, providing warmth and comfort for the mother and her puppies.
Congratulations! You’ve successfully built a simple plywood whelping box for your pregnant dog. Remember to monitor your dog closely during whelping and seek professional veterinary advice if needed.
Additional tips:
- Removable pig rails: Consider adding removable pig rails made from PVC pipes to the interior of the box. These rails prevent the mother from accidentally rolling onto her puppies and provide them with a safe space to move around.
- Heat lamp: A low-wattage heat lamp can be used to provide additional warmth for the newborn puppies, especially during colder months. However, ensure proper placement and monitoring to avoid overheating.
- Regular cleaning: Maintain a clean and hygienic environment for the mother and her puppies by regularly changing the bedding and disinfecting the whelping box.
By following these steps and incorporating the additional tips, you can create a safe and comfortable whelping box for your dog, ensuring a smooth and successful birthing experience.
Large Whelping Box for Dogs & Puppies – PVC 48″

Introduce the ultimate versatile solution for your canine family with this Large Whelping Box, ideal for both large breed dogs and their puppies. Measuring a generous 48x48x18 inches, this PVC puppy playpen provides a spacious and secure sanctuary for dog breeding litters, ensuring mother and puppies can cuddle comfortably. Its high walls enhance safety by preventing energetic puppies from escaping, keeping them snug and protected. Beyond its primary function as a whelping pen, this robust unit can also transform into an engaging playground for your pets or even a raised garden bed, offering unparalleled flexibility for indoor and outdoor use.
Constructed from pet-safe, durable PVC material, this whelping box boasts waterproof and rustproof properties, guaranteeing a stable structure and long-lasting reliability. You’ll appreciate the peace of mind knowing your beloved pets are secure in their resilient haven. Designed with busy pet owners in mind, assembly is effortlessly tool-free, and its lightweight, portable nature allows for easy relocation. Maintenance is a breeze; the smooth PVC surface can be simply rinsed with water or wiped clean with a damp rag. Customize your setup with flexible door options: a doorless design for maximum security for recovering or pregnant dogs, or a convenient door feature with removable dividers for easy pet access.
Pros
- Multifunctional: serves as a whelping box, puppy playpen, or raised garden bed.
- Spacious (48x48x18 in) and secure with high walls.
- Made from durable, pet-safe, waterproof, and rustproof PVC.
- Easy, tool-free assembly and maintenance.
- Lightweight and portable for flexible placement.
- Flexible door options for varied needs (doorless or easy access).
- Suitable for both indoor and outdoor environments.
Cons
- White color may show dirt more easily.
- May require additional bedding for ultimate comfort for puppies.
- Dimensions include caps and posts, actual interior space might be slightly less.
3. Plywood and PVC Whelping Box
Step-by-Step DIY Guide to Build a Plywood and PVC Whelping Box
Providing a safe and comfortable birthing environment for your expecting canine companion is crucial. Building a plywood and PVC whelping box offers a sturdy, easy-to-clean, and cost-effective option. This step-by-step guide equips you with the knowledge and instructions to construct a functional and practical whelping box using readily available materials.
Materials:
- (4) 4′ x 8′ sheets of ½” plywood
- (8) 2” x 4” x 8′ lumber boards
- (2) sets of heavy-duty hinges
- Screws
- Drill
- Jigsaw
- Sandpaper
- Soft blankets or towels
- (4) 2” 90° DWV Sanitary Elbow
- (4) 2” PVC Sanitary Tee
- (2) 2” x 10′ DWV/40 PVC pipe
Before you begin:
- Consider the size: Determine the appropriate size for your whelping box based on your dog’s breed and the expected litter size. A general rule of thumb is to make the box at least twice the length and width of your dog when she is lying down.
- Choose a location: Select a quiet and draft-free location in your home for the whelping box. This will provide a sense of security and comfort for your dog during whelping and caring for her puppies.
Building the whelping box:
- Cutting the plywood panels:
- Use the jigsaw to cut the plywood sheets into the following pieces:
- Four side panels: Cut each sheet into four pieces, measuring according to your desired box height (typically 18-24 inches).
- One base panel: Cut one sheet to the desired length and width of the whelping box.
- Use the jigsaw to cut the plywood sheets into the following pieces:
- Constructing the walls:
- Lay the side panels flat on a work surface and secure them together using the 2″ x 4″ lumber boards and screws. Create a rectangular frame using the lumber boards along the top, bottom, and sides of the panels.
- Repeat this process for the remaining three walls.
- Assembling the base:
- Attach the four wall frames to the plywood base panel using screws and corner braces. Ensure a secure and stable connection.
- Creating the door:
- Cut one of the remaining plywood sheets into a piece suitable for the door (approximately half the width of the box and the same height as the walls).
- Attach hinges to one side of the door frame and a latch to the opposite side for easy access.
- Secure the door frame to the front of the whelping box using screws and corner braces.
5. Adding the PVC frame: * Drill matching holes through the center of each wall panel and the corresponding support panel, approximately 3 inches from the top. * Cut the PVC pipes into four 24″ sections. Insert each pipe section through the drilled holes, connecting the walls to allow for collapsing and expanding the box for easy storage. * Secure the PVC pipes in place using screws and corner braces on both sides of the walls and support panels.
6. Finishing touches: * Sand down any rough edges on the wood components for a smooth and safe finish. * Line the interior of the whelping box with soft blankets or towels, providing warmth and comfort for the mother and her puppies.
Congratulations! You’ve successfully built a plywood and PVC whelping box for your pregnant dog. Remember to monitor your dog closely during whelping and seek professional veterinary advice if needed.
Additional tips:
- Removable pig rails: Consider adding removable pig rails made from PVC pipes to the interior of the box. These rails prevent the mother from accidentally rolling onto her puppies and provide them with a safe space to move around.
- Heat lamp: A low-wattage heat lamp can be used to provide additional warmth for the newborn puppies, especially during colder months. However, ensure proper placement and monitoring to avoid overheating.
- Regular cleaning: Maintain a clean and hygienic environment for the mother and her puppies by regularly changing the bedding and disinfecting the whelping box.
With this plywood and PVC whelping box, you can create a safe and comfortable environment for your dog to whelp and care for her newborn puppies.
Roslaemic Whelping Box with Pig Rails – Small Pets

Provide a safe and nurturing environment for your small breed dogs and their precious puppies with the Roslaemic Whelping Box. This essential whelping supply comes complete with indispensable pig rails, critically designed to prevent accidental suffocation of newborns by the mother dog, significantly reducing the risk of crushing accidents. Measuring 30×30 inches internally with a height of 19 inches, this sturdy whelping pen is crafted from pet-friendly plastic, ensuring durability and easy maintenance. Installation is remarkably simple, requiring no tools and taking mere minutes, making setup hassle-free for expectant pet parents.
The Roslaemic Whelping Box boasts a thoughtful step design, allowing for adjustable entrance and exit heights. This feature enables easy access for the mother dog while effectively preventing adventurous puppies from climbing out. Maintaining hygiene is effortless as the smooth surfaces can be easily wiped clean, which is vital for the healthy development of young pets. This versatile indoor pen is also suitable for other small animals such as guinea pigs, bunnies, ferrets, and hedgehogs. Additionally, it comes with extra puppy whelping supplies, including a 34×34-inch washable puppy mat, 12 puppy collars, and 3 growth charts, providing comprehensive support for your new litter.
Pros
- Includes essential pig rails to prevent puppy suffocation.
- Comes with extra whelping supplies: washable mat, collars, growth charts.
- Sturdy, pet-friendly plastic construction.
- Easy, tool-free installation in just five minutes.
- Step design allows adjustable entry/exit for mother and prevents puppy escape.
- Simple to clean by wiping, promoting hygiene.
- Suitable for various small pets beyond dogs.
Cons
- Only suitable for small dogs and other small animals, not large breeds.
- Limited to indoor use.
- Plastic construction, while durable, might not be as heavy-duty as metal alternatives.
4. Whelping Box for Large Dogs
Step-by-Step DIY Guide to Build a Whelping Box for Large Dogs
Expecting a litter of adorable puppies from your large breed dog? Creating a whelping box specifically designed for their size is essential for a smooth and successful birthing process. This step-by-step DIY guide provides you with the knowledge and instructions to construct a large and comfortable whelping box, ensuring a safe and nurturing environment for your expecting canine companion and her soon-to-be-born pups.
Materials:
- (4) 4′ x 8′ sheets of ¾” plywood
- (8) 2” x 6” x 8′ lumber boards
- (2) sets of heavy-duty hinges
- Screws
- Drill
- Jigsaw
- Sandpaper
- Soft blankets or towels
Before you begin:
- Size considerations: Due to the larger size of the dog, whelping boxes for large dogs require specific dimensions. A general recommendation is to make the box at least 3 times the length and width of your dog when she is lying down. Additionally, factor in the expected litter size to ensure adequate space for the mother and her puppies.
- Location selection: Choose a quiet and draft-free location in your home for the whelping box. This will provide a sense of security and comfort for your dog during whelping and caring for her puppies.
Building the whelping box:
- Cutting the plywood panels:
- Use the jigsaw to cut the plywood sheets into the following pieces:
- Four side panels: Cut each sheet into four pieces, measuring according to your desired box height (typically 24-30 inches for large dogs).
- One base panel: Cut one sheet to the desired length and width of the whelping box.
- Use the jigsaw to cut the plywood sheets into the following pieces:
- Constructing the walls:
- Lay the side panels flat on a work surface and secure them together using the 2″ x 6″ lumber boards and screws. Create a rectangular frame using the lumber boards along the top, bottom, and sides of the panels.
- Repeat this process for the remaining three walls.
- Assembling the base:
- Attach the four wall frames to the plywood base panel using screws and corner braces. Ensure a secure and stable connection, considering the weight of the mother and her puppies.
- Creating the door:
- Cut one of the remaining plywood sheets into a piece suitable for the door (approximately half the width of the box and the same height as the walls).
- Attach hinges to one side of the door frame and a latch to the opposite side for easy access.
- Secure the door frame to the front of the whelping box using screws and corner braces.
5. Finishing touches: * Sand down any rough edges on the wood components for a smooth and safe finish. * Line the interior of the whelping box with soft blankets or towels, providing warmth and comfort for the mother and her puppies.
Congratulations! You’ve successfully built a whelping box for large dogs. Remember to monitor your dog closely during whelping and seek professional veterinary advice if needed.
Additional tips:
- Removable pig rails: Consider adding removable pig rails made from PVC pipes to the interior of the box. These rails prevent the mother from accidentally rolling onto her puppies and provide them with a safe space to move around.
- Heating pad: A low-wattage heating pad placed under a layer of bedding can provide additional warmth for the newborn puppies, especially during colder months. Ensure proper placement and monitoring to avoid overheating.
- Regular cleaning: Maintain a clean and hygienic environment for the mother and her puppies by regularly changing the bedding and disinfecting the whelping box.
By following these steps and incorporating the additional tips, you can create a spacious and comfortable whelping box for your large dog, ensuring a safe and stress-free birthing experience for her and her precious puppies.
Whelping Box for Dogs & Puppies – 38″ Oxford

Provide a safe, warm, and comfortable environment for your expectant mother dog and her new litter with this Whelping Box for Dogs and Puppies. Constructed from soft and breathable 150D Oxford fabric, this whelping pen ensures a cozy birthing space for the mother and a secure, centralized living area for the puppies. Measuring 38x38x18 inches, it’s ideally sized for medium to small dog breeds. The design prioritizes ease of use, featuring a simple, tool-free installation process that allows for quick setup and disassembly, making it highly portable for both indoor and outdoor use.
This puppy playpen is built for stability and safety, with a sturdy structure reinforced by bottom suction cups (6.2 cm diameter) that provide excellent grip, preventing accidental movement or overturning. Keeping the whelping box clean is effortless thanks to the included highly absorbent and waterproof whelping pad, which effectively locks in moisture and can be reused multiple times after washing, ensuring a dry and hygienic environment. Thoughtful features include a zippered door for easy entry and exit for dogs, and a set of puppy ID collars to help distinguish each newborn, supporting efficient care and management of the litter.
Pros
- Soft, breathable Oxford fabric for comfort.
- Easy, tool-free installation and quick disassembly.
- Sturdy and stable design with anti-slip suction cups.
- Includes highly absorbent, reusable waterproof whelping pad.
- Features a convenient zippered door for easy access.
- Comes with puppy ID collars for litter management.
- Portable for both indoor and outdoor use.
Cons
- Not suitable for large breed dogs due to size.
- Fabric material may be less rigid than PVC or metal alternatives.
- Requires regular cleaning of the fabric and pad.
5. High-End DIY Whelping Box
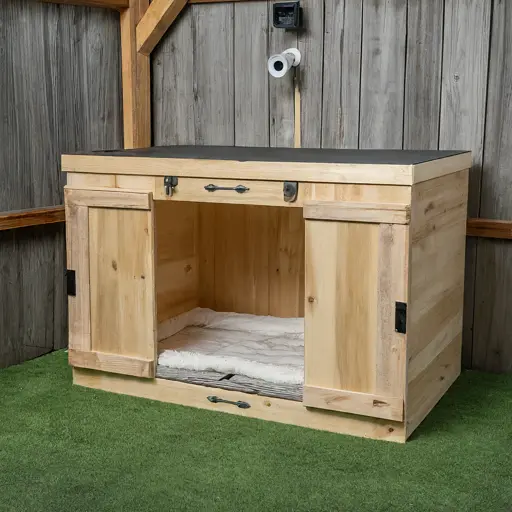
Step-by-Step DIY Guide to Build a High-End Whelping Box
Looking to provide your expecting canine companion with the ultimate birthing experience? Consider building a high-end DIY whelping box. This step-by-step guide will equip you with the knowledge and instructions to construct a luxurious and functional whelping box, offering exceptional comfort and safety for your dog and her newborn puppies.
Materials:
- High-quality, pre-finished plywood or MDF boards (¾” thickness)
- (8) 2” x 4” x 8′ lumber boards (treated or pressure-treated)
- (2) sets of heavy-duty, soft-close hinges
- Screws
- Drill
- Jigsaw
- Sandpaper
- Soft blankets or towels
- Optional:
- Vinyl flooring (easy to clean and disinfect)
- Heating pad (low-wattage)
- Security camera system
Before you begin:
- Plan and design: While size recommendations are similar to standard whelping boxes, consider creating a more spacious design for a high-end whelping box. Factor in your dog’s breed, expected litter size, and desired features like an attached whelping pool or heating pad compartment.
- Location selection: Choose a quiet and draft-free location in your home for the whelping box. Ensure the chosen space is large enough to accommodate the finished box and provide ample room for you to care for the mother and her puppies.
Building the whelping box:
- Cutting the panels:
- Use the jigsaw to cut the plywood or MDF boards according to your planned design. This may include side panels, base panel, door frame, and additional components like a whelping pool or ramp.
- Constructing the walls:
- Assemble the side panels using the 2″ x 4″ lumber boards and screws, creating a sturdy frame. Ensure all joints are secure and level.
- Assembling the base:
- Attach the framed walls to the plywood or MDF base panel using screws and corner braces. Consider adding additional support beams underneath the base for larger breeds.
- Creating the door:
- Cut a door panel and attach hinges to one side of the door frame. Install a soft-close mechanism and a secure latch on the opposite side for easy access.
- Adding features (optional):
- Whelping pool: If incorporating a whelping pool, create a separate compartment within the box lined with vinyl flooring for easy cleaning. Ensure proper drainage and maintain a shallow water level.
- Heating pad compartment: Designate a specific area within the box for a low-wattage heating pad, placing it under a layer of bedding for additional warmth.
- Security camera system: Consider installing a camera system to remotely monitor the mother and her puppies, providing peace of mind and allowing you to check on them without disturbing them.
6. Finishing touches:
- Sand down any rough edges on the wood components for a smooth and safe finish.
- Line the interior of the whelping box with soft blankets or towels, providing warmth and comfort for the mother and her puppies.
- Test all features like the door, whelping pool (if applicable), and heating pad (if applicable) to ensure they function properly.
Congratulations! You’ve successfully built a high-end DIY whelping box for your expecting dog. Remember to monitor your dog closely during whelping and seek professional veterinary advice if needed.
Additional tips:
- Removable pig rails: Consider adding removable pig rails made from PVC pipes to the interior of the box. These rails prevent the mother from accidentally rolling onto her puppies and provide them with a safe space to move around.
- Regular cleaning: Maintain a clean and hygienic environment for the mother and her puppies by regularly changing the bedding and disinfecting the whelping box.
By following these steps and incorporating the additional tips, you can create a luxurious and functional whelping box for your dog, offering a comfortable and safe birthing environment for her and her newborn puppies.
Exroo Whelping Box for Large Dogs & Puppies, 48″

Create a safe and spacious birthing environment for your large breed dogs and their puppies with the Exroo Whelping Box. Measuring a generous 48″x48″x19.5″, this EZ whelping kit offers ample nursing space, ensuring comfort for both the mother dog and her litter. The upgraded design simplifies installation, allowing for quick and easy assembly by just one person, providing a hassle-free setup experience during a crucial time. Constructed from durable, heavy-duty PVC material, this whelping box is built for stability and longevity, having undergone multiple crash safety tests to ensure it’s a reliable sanctuary for your canine family.
This dog birthing box features an upgraded design with a waterproof floor mat included for effortless cleaning, making maintenance convenient for busy pet owners. The entire product is designed to be easily removable for thorough cleaning. Its intelligent layout provides an independent resting area for the mother after breastfeeding, while a removable, height-adjustable door ensures puppies can always feel their mother’s presence. As the mother recovers, the center panel can be fully removed to transform the whelping box into a large play space for growing puppies. With your purchase, you also receive a 24-month warranty and access to friendly customer service for peace of mind.
Pros
- Large 48″x48″x19.5″ space ideal for large breed dogs and litters.
- Easy and quick single-person installation.
- Safe, heavy-duty PVC construction for durability and stability.
- Includes large washable pee pads and waterproof floor mat for easy cleaning.
- Removable, height-adjustable door for flexible access and puppy safety.
- Converts into a large play space by removing the center panel.
- Comes with a 24-month warranty and customer service.
Cons
- Primarily designed for indoor use.
- White color may show dirt more easily.
- Assembly, while easy, still requires some effort compared to pop-up options.
Conclusion
In conclusion, building a DIY whelping box allows you to personalize the birthing environment for your expecting canine companion, fostering a sense of security and comfort during this crucial time. Whether you choose a simple and functional design or opt for a more high-end approach with additional features, the key is to prioritize safety, hygiene, and comfort for both the mother and her newborn puppies. Remember to consult your veterinarian for guidance and ensure you have the necessary supplies readily available before your dog’s whelping date arrives. With careful planning and these helpful guides, you can create a suitable whelping box for your furry friend, welcoming her precious pups into the world in a loving and nurturing environment.
About the Author